
Lesson 01.7
Your Left Hand
Learn to place your left hand on C–D–E–F–G and play your first five-finger patterns using fingers 5–4–3–2–1.
◉ Beginner friendly
▥ Left hand
◎ Five-finger position
Lesson Progress
Meet Your Left Hand
So far, your right hand has done most of the playing. Now it’s time to give your left hand a turn.
The good news is that the finger numbers work exactly the same way on both hands:
Thumb = 1 · Index = 2 · Middle = 3 · Ring = 4 · Little finger = 5
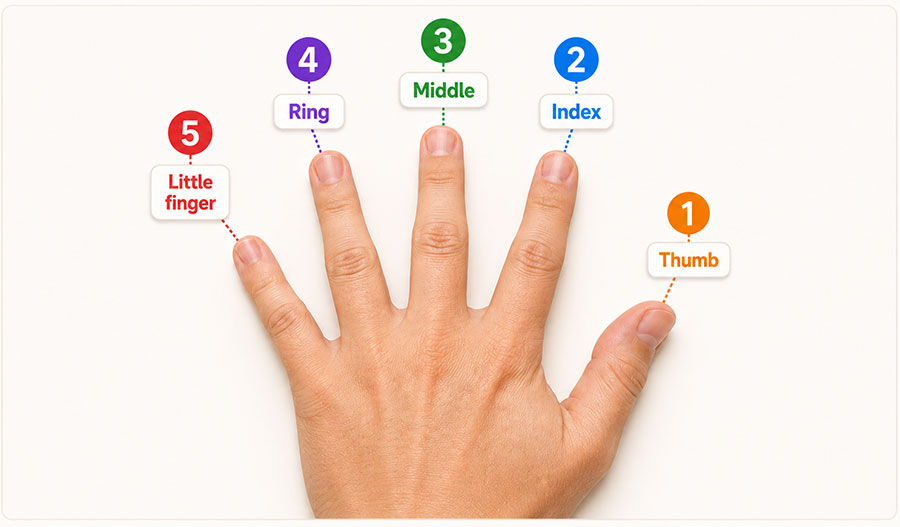
Hold your left hand comfortably in front of you and gently wiggle each finger as you say its number:
1 – 2 – 3 – 4 – 5
Then go back:
5 – 4 – 3 – 2 – 1
Don’t worry about the piano keys yet. For now, simply get comfortable matching each finger with its number.

Remember: On both hands, your thumb is always finger 1 and your little finger is always finger 5.
Left-Hand Finger Numbers
Now let’s look at how your left-hand fingers line up with the piano keys.
Place your left hand over C–D–E–F–G. This time, your little finger starts on C and your thumb rests on G.
C – D – E – F – G
5 4 3 2 1
Try pressing each key slowly, one at a time:
5 – 4 – 3 – 2 – 1
Notice that the finger numbers get smaller as the notes move higher. This is the opposite of the right-hand pattern you learned earlier.
Keep your hand relaxed and let each finger rest naturally over its own key.
Remember: For the left hand, C = 5 · D = 4 · E = 3 · F = 2 · G = 1.
Place Your Left Hand on C–D–E–F–G
Now it’s time to place your left hand on the keyboard.
Find Middle C, then place your left-hand little finger (5) on C. Let the other fingers fall naturally onto the next four white keys.
C – D – E – F – G
5 4 3 2 1
Your fingers should now be:
5 = C · 4 = D · 3 = E · 2 = F · 1 = G
Keep your hand relaxed. Your fingers can stay gently curved, with each fingertip resting over its own key. You do not need to stretch or press the keys yet.
Take a moment to look at your hand and say the note and finger number together:
C–5 · D–4 · E–3 · F–2 · G–1
Then lift your hand away and try finding the position again without looking at the finger-number guide.
Remember: Little finger 5 starts on C, and thumb 1 rests on G.
Play C–D–E–F–G
Now let’s play your first five notes with the left hand.
Keep your fingers resting on C–D–E–F–G. Starting with your little finger, play each note slowly:
C – D – E – F – G
5 4 3 2 1
Play one note at a time. After each finger plays, let it relax before moving to the next note.
Try the pattern several times:
C – D – E – F – G
C – D – E – F – G
Keep your wrist relaxed and avoid lifting your fingers too high. There is no need to play quickly—the goal is to make each finger movement feel comfortable and controlled.
Once it feels easier, use the steady beat from your previous lesson. Count aloud:
1 – 2 – 3 – 4 – 5
and play one note with each count.
Come Back Down
Now let’s reverse the pattern and bring your left hand back to C.
Start with your thumb (1) on G and play each note slowly as you move downward:
G – F – E – D – C
1 2 3 4 5
Play one note at a time, keeping your hand relaxed and your fingers gently curved.
Try the pattern several times:
G – F – E – D – C
G – F – E – D – C
As you play, notice that the note names move downward while the finger numbers get larger.
Once the movement feels comfortable, try playing with a steady beat. Count evenly as you play each note.
Play Up and Back Down
Now let’s put both movements together into one smooth left-hand pattern.
Start with your little finger (5) on C and play up to G:
C – D – E – F – G
5 4 3 2 1
When you reach G, change direction and come back down to C:
G – F – E – D – C
1 2 3 4 5
Put the whole pattern together:
C – D – E – F – G – F – E – D – C
5 – 4 – 3 – 2 – 1 – 2 – 3 – 4 – 5
Try to make the change of direction at G feel smooth. Keep your hand relaxed and let each finger stay over its own key.
Start slowly. Once the pattern feels comfortable, play it again with a steady beat, keeping every note even.
Left-Hand Challenge
For this challenge, use the C–D–E–F–G below Middle C.
Find Middle C, then move one octave lower to the next C on your left.
EXPLORE THE KEYBOARD
The Names of the White Keys
The white keys use seven note names: A, B, C, D, E, F and G. The same pattern repeats across the keyboard. The orange Start here key shows the C one octave below Middle C.
Place your left hand there:
C = 5 · D = 4 · E = 3 · F = 2 · G = 1
Then connect your MIDI keyboard and begin the challenge.
Left-Hand Challenge
Connect your MIDI keyboard and play C–D–E–F–G with your left hand. Follow the highlighted keys.
You completed the left-hand challenge.
Quick Check
Before you finish, check what you remember about your left-hand position.
Question 1
Which left-hand finger plays C?
Question 2
Which left-hand finger plays G?
Question 3
Where does your left hand start for this lesson?